Las Vegas Drywall Repair is pretty tough, but it’s not indestructible. A nail or screw sticking out, a protruding picture frame hanger, and even children flinging toys can all leave behind unsightly holes or dents in your wall.
Minor indentations are easy to fix and often require only spackle, a putty knife, and some interior painting to make the repair almost unnoticeable. Larger damage, however, may require more work.
Drywall is a great material for walls, but it’s not indestructible. A misguided doorknob, kids flinging toys or even the vibrations of an earthquake can knock holes in your home’s drywall. While minor blemishes like dents can be covered with a dab of paint, large holes need patching to look and function properly. With a few key products and some pro tips, you can make quick work of repairing damaged drywall.
Holes smaller than about the size of a doorknob can be repaired with a patch kit. These kits come with an adhesive patch that sticks to the wall and covers the hole. For best results, sand the surrounding area smooth and wipe it clean before applying the patch. For larger holes, you’ll need a sheet of drywall patch plaster and mesh joint tape. Tape is necessary to strengthen the patch and reduce shifting of the drywall after the patch is applied. You also need a drywall knife to cut the patch to size and to apply the joint compound.
A drywall knife is a flat, rectangular tool with a sharp, pointed tip that is designed to cut through drywall, but it can also be used to scrape off old wallpaper or to clean up small areas of debris on the surface of the wall. It is a good idea to buy a couple of drywall knives in different sizes so you can find the one that works best for your repair project. Also, a gallon tub of joint compound and a roll of paper joint tape are essential if you’re going to do some patching.
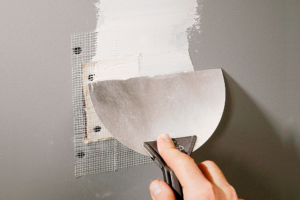
Once you have your patch and tools, you’re ready to begin the drywall repair process. If the hole is in a corner where two sheets meet, use a utility knife to cut away any loose, flaking edges of the drywall on both sides of the damage. This is where you’ll need to be most careful, as the sharp edge of the blade can tear through the drywall and into the framing wood behind it.
Next, apply a coat of spackling or drywall compound over the entire patch, using a putty knife made for drywall (not a wide utility knife) to smooth the patch and feather the edges so it blends in with the rest of the wall. After the first layer dries, apply a second layer and sand until it’s smooth and ready for priming and painting.
Repairing Holes
Small holes and dents, caused by fasteners or by kids playing indoors, can usually be repaired with a little drywall compound and a putty knife. The first thing to do is to sand the area around the hole smooth, wipe away any wood shavings, and apply the compound. It’s important that the surface is completely clean before applying the patch, because any dirt will prevent the drywall compound from sticking to the wall.
The next step is to select a drywall patch that is slightly larger than the hole, and cut it to size using a utility knife. This patch will be used to cover the hole and provide additional support for the drywall compound. Once the patch is in place, sand it down and apply another coat of compound. When the second coat is sanded, feather the edges to make the repair look natural.
It’s possible to fix medium-sized holes without a patch by applying a technique known as “feathering.” This involves filling the hole with a thicker application of drywall compound, then sanding it down and applying a final coat. This will result in a much smoother finish, but it does require more skill and time than simply patching the hole with drywall spackle.
Larger holes can be repaired with a drywall patch, but this method is not as easy for homeowners to master. It’s necessary to cut a piece of drywall that is exactly the size of the damaged area, and this can be a tricky task if you don’t have any experience cutting drywall. Using a hand saw, or even a circular saw, can be difficult and dangerous for beginners.
Some cracks and holes in drywall can’t be fixed with a drywall patch, and are more severe than simple dings and dents. These cracks may indicate a structural problem, such as a sagging ceiling or a leak. It’s often better to call in a professional for these types of repairs, rather than trying to paper over the issue. A professional can also help you find the source of the problem and correct it before it gets worse.
Repairing Cracks
The drywall that makes up the walls of your home is strong and durable, but that doesn’t mean it can’t crack over time. Drywall can crack in a few different ways, from fine hairline cracks that show up around windows and doors to larger cracks that run along the length of the studs. The key to successfully repairing cracks is to ensure that the surface you are patching is smooth and flat, and that all the cracks are properly filled in with drywall mud (also called joint compound).
First, sand the affected area with a sanding sponge until it’s completely smooth. This will help prevent the new mud from creating unsightly bumps and inconsistencies. Once the sanding is done, vacuum the area to remove any dust or debris that may have accumulated. Next, apply a thin coat of joint compound to the crack. Let it dry completely, then sand it again until it’s smooth and even. Repeat the process as necessary until you have a smooth and even surface to paint over.
Another common type of drywall crack is a nail pop, which occurs when a nail pierces through the drywall and shows through the surface. The easiest way to fix this type of problem is to countersink the nail and re-nail it in a spot that is farther away from the surface. You can also use a nail set to “pop” the nail up through the drywall surface and out of sight.
For more serious cracks, you’ll need to use a special mesh tape designed for drywall repair to cover the crack and the heads of any nails that are protruding from it. Some experts recommend using hot mud, which is premixed and dries much more quickly than traditional drywall compound.
Once you have the tape in place, apply a thin layer of joint compound over the entire crack, being sure to fill the entire hole and embed the tape. Allow it to dry completely, then sand it again with an electric sander until it’s smooth.
If you’re concerned about the crack reoccurring, it might be worth your while to consider replacing that section of the drywall with a new piece. This is a more involved project than repairing small holes or cracks, but with the right tools and technique it’s not nearly as difficult as it might seem at first glance.
Repainting
Paint can be a great finishing touch to any room, but it’s important to have it applied properly. Drywall often has dents and cracks that may be difficult to see without closer inspection, but with the right preparation and application of several coats of paint, it can look like it never even happened.
The first step to painting drywall repair is to make sure the walls are clean and free of debris, dust, and cobwebs. This will help ensure that the paint adheres to the drywall and provides a smooth finish.
Once the drywall has been cleaned, it should be sanded and primed before you begin painting. Using the proper primer will prevent hot spots and shadows from showing through the paint, which can detract from your overall appearance. Then, once the primer has dried, you can apply the wall paint.
If you want a professional looking finish, it is recommended that you use two to three coats of paint. This will help to hide any minor imperfections, and it will also allow the drywall to last longer.
When painting, be careful to follow the instructions on the paint container. It is important to stir the paint thoroughly, and it’s a good idea to use a brush for smaller areas and a roller for larger ones. It is also recommended that you use a high quality, and properly tinted, primer and paint.
Small dings and holes can be fixed with spackle or joint compound. If you use spackle, be sure to buy the pre-mixed variety that is easy to spread. A putty knife will work well to apply the spackle, and then you can scrape away any excess with your hand or a knife. If you’re using joint compound, apply a thick layer and let it dry before sanding.
Nail and screw pops are another common drywall issue that can be easily fixed with a little bit of mud and a putty knife. Once the mud has dried, simply sand the area to create a smooth surface.
If you are working on a large project, it is important to take your time and do the job correctly. Trying to rush through the steps can lead to uneven applications and splotchy areas that will show up in your finished product.